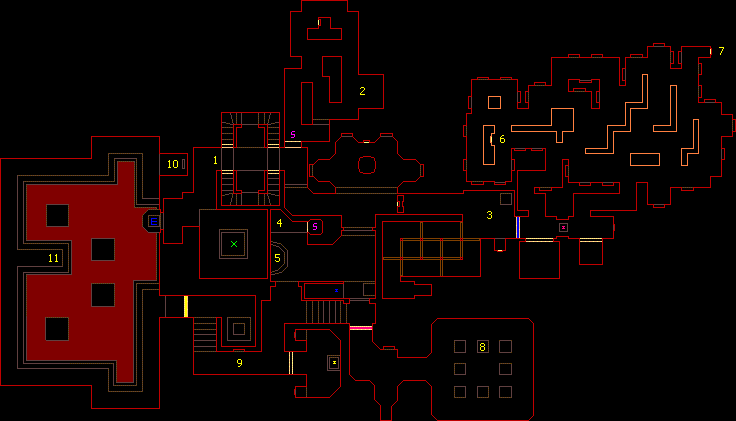
Final Outpost:

When you activate the switch in front of you at the beginning of this level, zombies will have you surrounded. Some place on the floor activates the lift out of this room. If you miss it, just walk around until it opens again. Nearby at the top are a couple of health packs next to a grated window. On the other side of the window is the exit platform. There are several imps around the room you can see into, and this is a good place to snipe at them with the shotgun.
As you come around the corner, move slowly and carefully forward. The floor will drop down and zombies will start shooting. To the left of the chaingun there is a secret area full of lost-souls. Activating the switch releases more of them and also opens up the area. The switch to the north unlocks the way out of this room.
Blue Key:
Beyond the door is a hallway with a switch at the end and a window. Blast the imp standing by the red door with his
back to you. Activating the switch will drop the west wall, where there is a group of imps hiding. A switch in this
room removes the block where the other switch was.
Here you will see the blue key door and a teleport pad. From the south side hallway will come another party of imps. Just stand at the end of the hall and pick them off. This hall is really part of a maze which will change direction after you grab the shotgun at the end. This will also bring another squad of imps after you.
Step onto the teleport and you will arrive above the blue key, in the open area you could see through the last window. There is no other way out of this room yet except the teleport. To get it back down, walk across and step up to the platform at 4. The teleport will lower again so you can get back out. There is also a secret chamber holding a suit of combat armor near point 4. Just search the wall until it opens.
Red key:
Just behind the blue key door is the red key on a pedastle. This large room is a maze to begin with. It will be empty
when you first enter. The red key pedastle lowers by activating the switches in this maze. The first two switches also
lower some of the walls and summons enemies. The first switch at 6 will bring in a group of imps. The second switch at
7 will call a squad of zombies led by a baron of hell. The alcove there is good cover from the approaching troops, but
don't stay there too long or the baron will block your only way out.
Once the enemies are eliminated, the final switch behind the pedastle will allow you to retrieve the red key. A small room with rockets and medkits will open up, as will another room by the blue door where a hell-knight will be waiting.
Yellow key:
Just outside the blue door, a new switch has also appeared across from the teleport. This switch lowers a platform at 5,
allowing you access to the rest of the level. It is on a timer, but click the switch and back into the teleport and you
should have plenty of time to reach it.
Run across to the opening at the top and take out the hell-knight that is patrolling there. Lost-souls are floating around behind the red key door, and several zombies are hidden in the column room there. Each of the columns will lower by activating the switches on the sides. The one marked 8 has a plasma rifle on top of it. The rest each support a zombie or an imp.
The switches in the room where the yellow key is do nothing to allow access to it. Instead, go down the hall to find a hidden panel switch at 9 to lower the key pedastle. Continuing down the stairs at the end of the hall, you come to the yellow key door. There is a soul-sphere to the east, but picking it up will summon a baron of hell to block your exit. He will appear near the yellow door. If you are feeling fast, grab the sphere and let him see you. When he comes after you, run past him up the stairs where you can safely take him out without getting hit.
Through the yellow key door is the large room you could see from near the start point. Even if you took out all the imps you could see from there, there will probably be one or two waiting just inside the doorway. On the other side of the room at point 10 is the switch that starts the final battle of this level. There will likely be another imp there also.
Activating the switch will bring a baron of hell to each of the platforms in the room, and a couple of hell-knights on the walkway across from you. The alcove the switch is in provides good cover from the barons, so focus your attacks on the hell-knights. If they can get into a good position before you can take them out, you will have no place to dodge their fireballs. After that, it is just a matter of rocketting the barons and side-stepping their fire. When they are down, a pathway rises from point 11 to the exit.
Back to Top / TC map index / Classic DOOM home page