Outpost Omega:
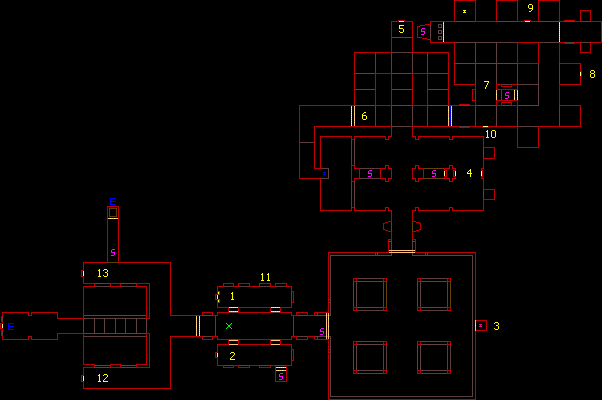
To the right of the start point is a small room (1) with some zombies in it. The switch in this room requires a yellow key to activate it. On the other side there are some lost-souls and a switch that opens the door to the east. The first secret area is here also. A hidden panel switch at 11 will open a chamber holding a chaingun in room 2 if you are quick.
Before you step into the large room that has just opened, search the right side for a hidden panel switch. This opens a timed alcove (3) directly opposite from your position where there is a red key. You need the key to open the secret exit, but it doesn't do anything else. The rocket launcher in the middle of this room is the real key. Nothing else will open until you pick it up, so if you are at maximum capacity you will need to fire one off.
The room will get darker when you do this, and platforms will rise in the four cages, each holding a mancubus. There are several strategies for this battle. They fire fairly slowly and can't track you well when you move, so if you keep moving you can avoid getting hurt much. If you elect this option, be sure to use the super shotgun instead of the rocket launcher to avoid damaging yourself. My favorite method is to find the outside corner of one of the cages to start with. You have good cover from the one closest to you, and you can step quickly out to either side and rocket the adjacent cages. Once those two are down, move to either of the new safe places and take out the other two.
Blue Key:
With the mancubus' down, a door will open to the north. Inside are zombies, imps, cacodemons, and pain elementals. Stand
back between the cages and send rockets down the long hallway. When the smoke and noise goes down, most everything will
be wasted. Just be careful to switch back to the chaingun if any lost-souls get too close. As you head in to check out
the new area, a pack of imps will teleport in to defend. You can see the blue key you need in a room to the west. The
switches in this area (4) open panels nearby with rockets and health. If you want the armor or shotgun, walk down the
hall towards the switch at 5 (but don't activate it yet) until you hear a sound, then run back and get on the platform
with the armor. Hitting the switch by the armor lowers the platform holding the shotgun, so jump off quickly and run for
it before it rises again.
The switch opens passages east and west and zombies start coming down the stairs revealed. Both lead up to the same place, so clear the area out and head for the door at 6. Past the door, a couple of platforms drop and you find yourself right behind the blue key. Picking it up will bring in another pack of imps, but don't stay there to fight them. Go back through the lifts and gun them down from the hallway.
Yellow key:
The blue door opens into one of the most confusing and tricky areas of the game. As soon as you drop down from the ledge
just inside the door, a hell-knight will appear to the north and an imp will be firing at you from the east. When they are
history, explore and get an idea of the area. When you reach the bottom level, both of the teleports in the northeast corner
will take you back to the blue key door. You may find yourself using them quite a bit getting everything out of this
level. One of the alcoves to the north holds the yellow key and an imp. There are three alcoves and only the one with the
key is safe to jump into. The other two are crusher traps. Once you have the key, you can go back to room 1 and activate
the switch there, which opens the way to the exit. Or you can stay and find some secret areas.
You can see a secret chamber hidden in this cubic maze. Inside is a mega-sphere. There is also a suit of combat armor, a soul-sphere, and a backpack stashed in here. To get to the mega-sphere, look for point 8 and the switch there. As you near the switch a hell-knight will appear. Activating the switch (8) will lower the platform near 7 for a short time, but search the walls you can see from point 8. Another switch you can only shoot at will be temporarily revealed at point 9. The process is complicated but worth it. Shoot the switch at 9, activate the lift at 7 and ride it up. Another secret timed switch shows up at point 10. Shoot this one too, then repeat the process.When you can do this all twice, the secret room will open up.
It is best to leave the mega-sphere for now. To get the soul-sphere, drop down to the nearest alcove west of 7. When you hear a sound, hop the rest of the way down and run for it before the bars close again. Try run across to get the combat armor and then the backpack. These are not easy to reach without the jump ability enabled.
On the way back to the exit, there is a berserk pack in the cage room where the rocket launcher was. Do NOT pick this up! If you do, the room will lock down again and the cages will be full of arachnotrons. To exit the level, activate the yellow keyed switch. The door opens to a hallway full of imps, bull-demons, and a couple of nightmare-demons. Timing it right will get the imps to start fighting the demons, then make for room 1 or 2 and stand in the doorway with the chainsaw. When it is safe, activate the switch at 12. This raises another switch in front of the stairway to the exit. This switch opens the way to the exit, but will start another assault of pain-elementals and cacodemons. Step back down the hallway and let them eat rockets.
The switch at 13 will then open a passage full of ammo which is always nice to find. The exit is now clear, but there is also a secret exit to level 34. To get there, listen as you go toward the normal exit. As soon as you hear the sound of a distant door opening, run back up the stairs and head to the left where the ammo cache was. There will then be a switch that opens a teleporter which is the secret exit to "Crisis". Both of these are on timers, so you must move quickly.
Many thanks to Kaiser for telling me the secret exit was on this map. Also, to Cry for discovering the red key was needed to open it.
Back to Top / TC map index / Classic DOOM home page